“The ability to simplify means to eliminate the unnecessary so that the necessary may speak.” ― Hans Hofmann
Our previous post, "Feature of the week: Embed your Google Slides Presentation", featured last week under WordPress Consulting category was regarding was regarding custom landing pages. The follow-up questions for the presented feature images raised additional features to be presented. This week, we'll continue to show you how to create your landing page. This time we will use a custom navigation menu with your custom content on your new landing page.
There are many options to implement a custom navigation menu. We have considered a simple approach, to satisfy several fundamental requirements:
- Specific use only (Use it only on hand-picked pages/posts).
- Finish within a day (No other distractions and exponential problem solving).
- Cheap-ish (Preferably without additional costs, especially keeping it running).
- Simple enough (To avoid professional intervention from it/marketing experts).
Ideas implemented from constrained points of view (biased developers, designers, sysadmins) will NOT BENEFIT YOUR online strategies, harming your long-term competitiveness.
The first option would be to use your active theme's second menu. However, very few themes have the feature to allow several menus, and even fewer to switch the main menu. Considering to switch theme, because you need an extra menu is not an option.
We're proposing a simple solution to solve your custom navigation need: a dedicated plugin. Using only skills and knowledge that you have and this blog post as a guideline. Owlsome, right? Let's start them!
Meet the solution:

ASK US ANYTHING WORDPRESS RELATED: We can offer you confidently, SEVERAL OPTIONS to choose which one suits your needs better.
To create your own Custom Navigation Menu, please install and activate the Menu Swapper plugin and follow this tutorial:

- Go to Settings » Menu Swapper
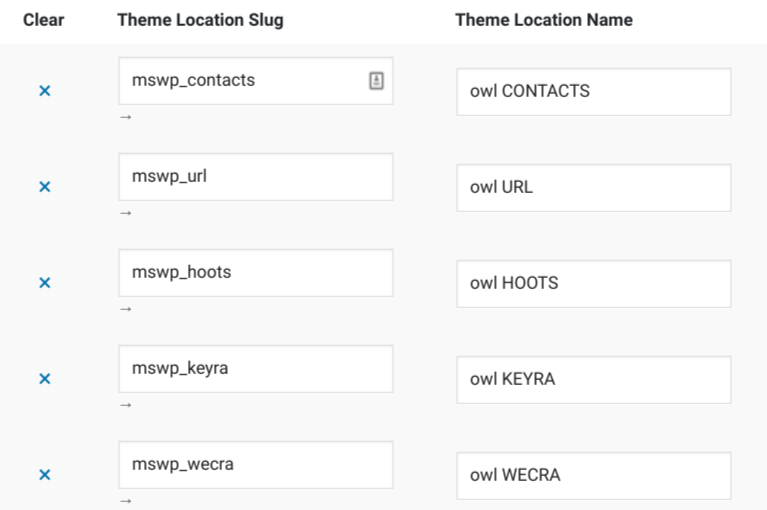
- Create a new theme location:
- Specify your custom "Theme Location Slug". Make it something unique.
- Specify your custom "Theme Location Name". Make it humanly readable for later use. Save.

- Go to Appearance » Menus
- Create a new menu for each location previosuly created.
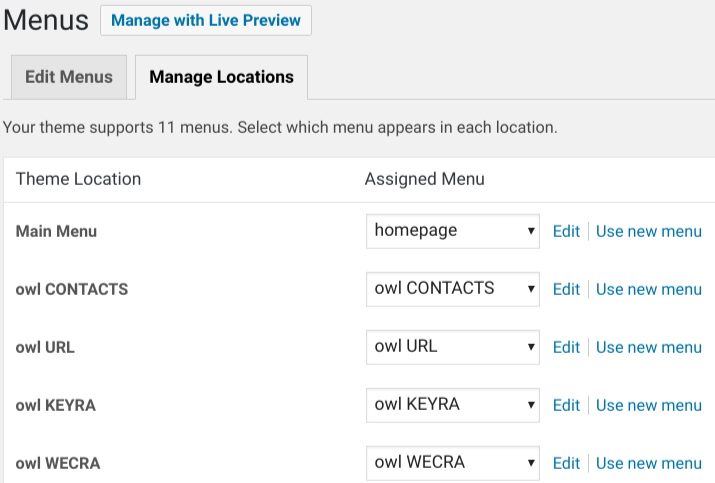
- Go to Appearance » Menus » Manage Locations
- Assign new menu with custom Locations. Save changes.

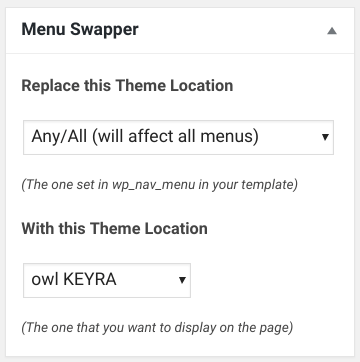
- For any posts or pages, should be a "Menu Swapper" box.
- Activate under Screen Options if not visible. (top of page, under your username).
- Replace ANY/ALL Theme Location With YOUR Theme Location.
- Preview. Save. Publish.
Ideas implemented from constrained points of view (biased developers, designers, sysadmins) will NOT BENEFIT YOUR online strategies, harming your long-term competitiveness.
We're passionate about helping you grow and make your impact
Continue being informed
Monthly vulnerability reports about WordPress and WooCommerce, plugins, themes.
Weekly inspiration, news and occasional with hand-picked deals. Unsubscribe anytime.


